Released October 12, 2020
Designed by Sarah Johnson
SKU: 20HW0113
Finished size:
3.25” wide x 3.71” tall x 1.5” deep
This design is available on:
Design Info & Supplies
Instruction Type:
PDF written instructionsMachine Compatibility
Cricut (excluding Cricut Joy), Silhouette (with software upgrade), Brother ScanNCut, and other machines and software that can open SVG files.Included File Formats:
SVG (solid lines for scoring)
SVG (dashed cut folds)
Paper/Cutting Area Size
8.5” x 11” or larger
Recommended Paper:
Card stock (at least 175 gsm recommended) in black, green, and white
Recommended Adhesive:
Hot glue
Glue dots or double sided tape
Other Supplies:
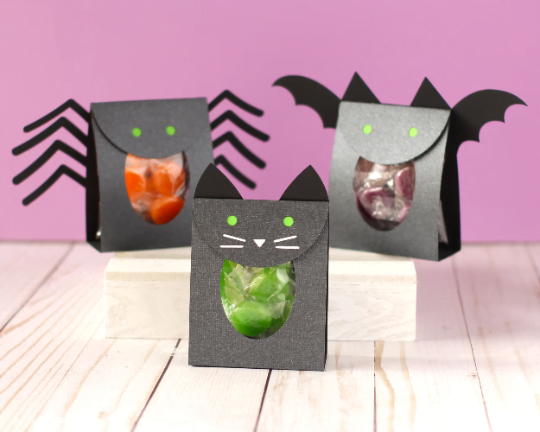
- 3" x 4" treat bags
- stapler
- candy
For a list of my favorite supplies, click here.
Assembly Instructions
- Gently fold on all the score lines. Decide which side of the paper you’d like to show most – this will be used for the front of the face piece and the section of the body piece that will be in the front.
- Glue the face backer piece(s) to the inside of the face piece. The spider and bat have one piece to attach, while the cat has two. For the cat design, the white piece should be layered over the green piece, matching them up on the bottom round edge. These should be positioned so the green piece covers the eyes, and the white portion covers the nose and whiskers.
- Attach the tab on the face piece to the body piece, lining it up with the straight edge on the top inside of the body piece.
- Fill your bag with treats, and fold over the top of the bag with about a 1/4” amount folded over. Hold it in place and position the bag on the inside front of the body piece (so it shows through the oval cut out) and staple it in place once on each side. Place a glue dot or double sided tape at the top center of the body piece, between the staples.
- Finally, bring the front and back sides of the treat holder together, placing the face piece over the front of the body, then press the face piece in place against the glue dot to secure it. That’s it!